Weapons and Armor in Infinite Dungeon Crawler
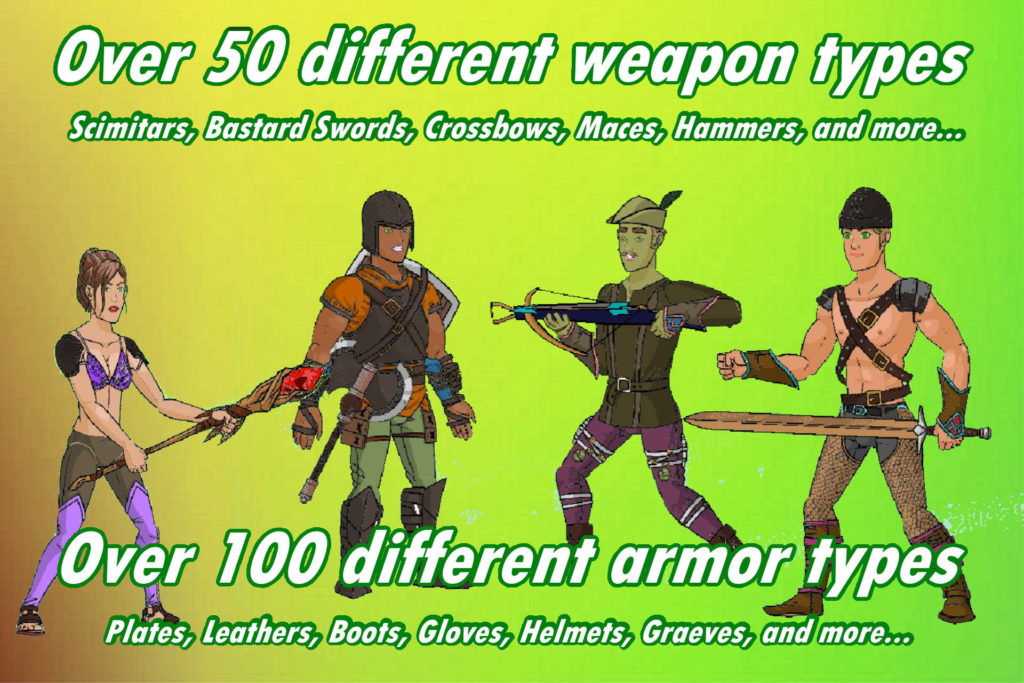
IDC has a wide variety of weapons to choose from.  Most of these are purchased at the Merchant in town, and the selection available is frequently changing.  Having a good weapon is critical to the game.  But money is usually tight.  In the game you will spend most of your money earned from expeditions in pursuit of better and better equipment.  You’ll pretty much want to check the Merchant’s stock at least every other time you come back from an expedition.  But also keep in mind that if you have your eye on a particular piece of gear, it may not be there by the time you save up.  Evervale is a busy place and the Merchant’s stock is constantly rotating.  Generally, if you see something you like and you have the funds, grab it. 

In the Fall during the Harvest Festival, there is a traveling merchant that stops by in town.  Her goods tend to be much nicer than the Merchant’s, but much more expensive.  If you see something that she has, that is pretty much your only chance to get it.  Her inventory completely changes every year.

Weapons (and armor) can occasionally be found while exploring.  It is also acceptable to take weapons from monsters that you vanquish.  Keep in mind that these are still considered to be loot, and if you have hirelings in the party and decide to keep a weapon, you’ll have to buy out the hirelings’ shares of it (even if you’re giving it to a hireling to use!).

When you first start a new game, you’re likely to have just enough gold to afford a poor quality weapon with next to nothing left over.  As you earn more gold, you’re going to want to upgrade your weapon as soon as possible before you start worrying about armor or other things.


Weapons can be categorized into either MELEE weapons or RANGED weapons. 

Melee weapons make physical contact with a target.  You generally have to be in an adjacent grid square to use a melee weapon (the exception to this is explained in a bit).  Plus, melee weapons can only attack in the CARDINAL directions (North, South, East, or West).  They cannot attack DIAGONALLY.

Ranged weapons can attack in any direction and from a distance.  They typically fire some sort of projectile, whether that is a physical object like an arrow or bolt, or an elemental charge like a lighting bolt, and have a maximum distance that can vary.  Ranged weapons typically require line-of-sight so you usually cannot hit someone behind a taller obstacle or another person.  You can shoot over lower objects, like smaller rocks, stumps, fences, etc..   

Weapons are broken up into TYPE categories.  Some weapons are one-handed (1H) and some are two-handed (2H).  The list of one-handed weapon types includes 1H-SWORDS, 1H-MACES, 1H-HAMMERS, 1H-AXES, DAGGERS, CLUBS and WANDS.  When equipping a one-handed weapon, you may hold another item in your off-hand, such as a shield or torch.  Rogues can hold a DAGGER in their off-hand — this is called dual-wielding and only Rogues can do it.  Dual-wielding contributes 50% of the off-hand’s damage when hitting an opponent and 50% of the off-hand’s blocking when defending. 

Two-handed weapon types include 2H-SWORDS, 2H-MACES, 2H-HAMMERS and 2H-AXES.  It also includes STAVES, BOWS, CROSSBOWS, SLINGSHOTS, POLEARMS, and SPEARS.  When wielding a two-handed weapon, you cannot hold anything else.


Different character classes will have an AFFINITY for certain types of weapons that grant a +10 ACC bonus, as discussed in the section on Accuracy, Defense and Magik Defense.  This is a significant boost and it is strongly recommended that characters stick to weapons for which they have an affinity, at least at the lower levels.  Also, as discussed in the Skills section, there are skills that will grant a +5 ACC and +10% DMG bonus for given weapon types.

Here is the list of weapon type affinities by character class:

FIGHTER: SWORDS, HAMMERS and AXES, both 1H and 2H, and SPEARS

MAGE: DAGGERS, STAVES, and WANDS

CLERIC: MACES and HAMMERS, both 1H and 2H, CLUBS, and CROSSBOWS

RANGER: AXES, both 1H and 2H, SPEARS, and BOWS

PALADIN: 1H-SWORDS, MACES, both 1H and 2H, POLEARMS, and SPEARS

DRUID: DAGGERS, CLUBS, 1H-HAMMERS, and STAVES

ROGUE: 1H-AXES, DAGGERS, CLUBS, BOWS, and CROSSBOWS

ALCHEMIST: 1H-MACE, CLUBS, 1H-HAMMERS, and SLINGSHOTS


Prior to detailing the specific characteristics for each weapon type, it is important to know that there are three factors that can affect all weapons: QUALITY, MATERIALS and RARITY.

A weapon’s QUALITY is described as either POOR, INFERIOR, AVERAGE, SUPERIOR, FINE or EXQUISITE (typically the word “Average” is not displayed, so if you see a weapon described as “whatever sword” versus “poor whatever sword” or “fine whatever sword”, then it is AVERAGE quality).  A weapon’s quality will affect its accuracy, damage, blocking, range for ranged weapons, and, of course, price. 

MATERIALS refers to the substance that the weapon is made from.  In order of worse to better, metal weapons can be made from IRON, BRONZE, STEEL, and LAVA-FORGED.  BOWS can be made from YEW, ASH and MULBERRY.  All other wooden weapons (and shields) can be made from OAK, HICKORY, MAHOGANY, ROSEWOOD, and IRONWOOD.  A weapon’s material will affect accuracy, damage, blocking, price, weight, and special status effects (as described below), and range for ranged weapons.  Regarding weight, the “better” the materials the less the item will weigh. 

A weapon’s RARITY will not affect any stats except for price.  However, “better” weapons will tend to be more rare, so there is a loose correlation.  Rarity can be described as COMMON, RARE, VERY RARE, EXTREMELY RARE, and UNIQUE.  For items beyond COMMON, the background color of the weapon’s thumbnail will change.  RARE and VERY RARE are light blue, EXTREMELY RARE is pink, and UNIQUE is gold.    

Some weapons can have magikal effects, such as a chance to inflict a negative effect (e.g., BLIND, BLEED, PANIC, etc), inflict elemental damage (FIRE, ICE, SHOCK, or POISON), have higher accuracy, inflict more damage, give off light, or have higher accuracy/damage against specific monster types (e.g., Undead).  These usually have their descriptions listed in dark blue.  These weapons can come in all qualities, materials and rarities, but being magikal will typically raise the price several fold if not more.

Many weapons have a small chance to inflict one or more status effects, such as WEAK, STUN or BLEED, depending on their shape and makeup.  The material of the weapon can boost this stat.  Also, as stated in the Accuracy, Defense and Magik Defense section, weapons have a BLOCKING value that can raise your DEF when attacked.  Some weapons are better at blocking than others, and some have none at all.  Also, the weapon’s material and quality will affect the value.  These will all be detailed with the various weapon types below:


ONE-HANDED SWORDS: A versatile weapon held in one hand.  Average accuracy for a melee weapon.  5%

TWO-HANDED SWORDS: Held in both hands and does more damage than it’s one-handed cousin, but less accurate.  +++  10%

ONE-HANDED AXE: A weapon popular with several classes and held in one hand.  Less damage than a sword but more accurate.  10%

TWO-HANDED AXE: Held in both hands it does more damage than the 1H version but is less accurate.  +++  10%

ONE-HANDED HAMMER: Has an accuracy and damage comparable to a 1H-AXE.  10%

TWO-HANDED HAMMER: Held in both hands it is more damaging than the 1H version but less accurate.   +++  10% 20%

ONE-HANDED MACE: A little more damaging than a 1H-SWORD but slightly less accurate.  ++  10%

TWO-HANDED MACE: More damaging than the 1H version but less accurate and requires both hands.  +++  10% 20%

DAGGER: A very accurate weapon, but only does half the damage of a 1H-MACE.  Rogues can equip a DAGGER in their left hand while wielding a 1H weapon in their right.  –  5%            

CLUB: This inexpensive 1H weapon does slightly less damage than a 1H-AXE or 1H-HAMMER, but has an accuracy comparable to most 2H weapons.  10%

POLEARM: This 2H weapon consists of a long pole with an axe head and sometimes spikes.  A significant benefit as a melee weapon is it can reach two squares (but still in cardinal directions).  The tradeoff is that is does slightly less damage than most other 2H weapons.  ++  10% 10% 

SPEAR: Similar to a POLEARM this 2H melee weapon can reach two squares (but still in cardinal directions).  It has an accuracy comparable to most 2H weapons but does damage comparable to 1H-AXES and 1H-HAMMERS.  —  5% 10% 

STAFF: These 2H weapons are a hybrid between melee and ranged.  When next to a target and in a cardinal direction, it will be used as a melee weapon.  Any other target position and it is used as a ranged weapon.  It is less accurate than most melee weapons, but more accurate in ranged mode.  However, in melee mode a staff will do both a small amount of physical blunt damage as well as elemental damage.  In ranged mode it only does elemental damage.  ++++

WAND: This 1H ranged weapon doesn’t do any physical damage, but does a small amount of elemental damage (typically less than a staff).  However, they are extremely accurate. 

BOW: This 2H ranged weapon is fairly accurate in the right hands of someone with a higher Dexterity.  However, arrows do about half the damage compared to a 1H-SWORD or 1H-MACE.  5% 10%

CROSSBOW: This 2H ranged weapon is very accurate and its bolts do as much damage as a 1H-MACE.  However, CROSSBOWS are unique in that they take an extra turn to RELOAD (the ATTACK button turns into a RELOAD button).  So you can essentially fire them only every other turn.  However, the wielder can use DEFEND during the turn that they RELOAD.  –  5% 5% 10%

SLINGSHOT: These 2H ranged weapons are a formidable weapon when wielded by an Alchemist.  Comparable in accuracy to a 1H-SWORD and more accurate than a BOW, the Alchemist can choose from a plain shot that does slightly less damage than an arrow from a BOW, or a fire, ice or shock shot (under the ABILITIES button) that does elemental damage comparable to a WAND.  An alchemist can also upgrade their abilities to include shots that can fire poison or acid, making them very versatile weapons.  There is no cooldown for SLINGSHOTS, so any one of the shots can be fired on any given turn.  5% (plain shot only)


RESISTANCES give the potential to avoid or reduce damage or negative effects from certain types of attacks.  They are usually displayed as a white shield, like you see on the right, with the icon of the particular status effect.  The one shown here is BLIND RESISTANCE.

Resistances can be grouped into several categories: ELEMENTAL, PHYSICAL and MENTAL.

ELEMENTAL resistances are those that block elemental damage, including FIRE, ICE, SHOCK, and POISON.

PHYSICAL resistances are those that block negative effects on the body or physical damage, like PHYSICAL DAMAGE, BLEED, SLOW, WEAK, STUN, KNOCKDOWN, BLIND, and DISEASE. 

MENTAL resistances are those that block negative effects on the mind, like MAGIKAL DAMAGE, PANIC, SLEEP, CONFUSE, and CHARM.

Generally, most characters have no natural resistances to anything, unless they receive one that is race-specific.  For example, Half-Goblins naturally have 50% POISON RESISTANCE and 15% SLOW RESISTANCE.  This is due to their Goblin genes that help to alleviate these conditions. 

The Fortitude attribute contributes to raising PHYSICAL resistances.  For each Fortitude point beyond 8, all physical resistances are raised by 5% (except PHYSICAL DAMAGE RESISTANCE).

Intelligence contributes to raising MENTAL resistances.  For each Intelligence point beyond 8, all mental resistances are raised by 5% (except MAGIK DAMAGE RESISTANCE).  The exception to this is CHARM RESISTANCE, which is a combination of both Intelligence (3%) and Charisma (2%).

Constitution contributes to raising ELEMENTAL resistances.  For each Constitution point beyond 8, all elemental resistances are raised by 3%.

Someone with a 100% resistance to any given effect cannot be harmed by it.  This includes if a negative buff is applied that can reduce someone’s resistance.  For example, skeletons do not bleed for obvious reasons and have 100% BLEED RESISTANCE.  Even if they were hit with an effect that lowered this resistance, they would still be immune to any BLEED attacks.   

Resistances do not affect the “hit or miss” calculation on attacks that use it.  But if an attack hits and there is some sort of effect for which the victim has a resistance, the resistance is used on a subsequent roll to see if the effect is resisted.  For example, if a Mage casts Ice Knife against a creature that has 25% ICE RESISTANCE, the normal hit or miss roll is made.  Assuming a hit is made, there is then a 25% chance that no ice damage will be sustained at all (however, if the Mage has any kind of ice accuracy boost, like the Put them on Ice skill, that will lower the chance of avoiding it).  But if the ice is not resisted, the victim will still have the ice damage reduced by whatever their resistance is.  In this case, the ICE DAMAGE would be reduced 25%.  So resistances help even if they don’t block all damage.

In the case of negative effects, like BLIND or SLOW, the resistance is used to reduce the attacker’s chance to inflict the effect.  For example, say a Paladin uses the Fear ability (which has a base 40% chance to inflict PANIC) against a creature that has 25% PANIC RESISTANCE.  In the calculations for the roll, essentially the 40% is reduced by 25%, so the chance to inflict is 30% (40 – 25%x40 = 30).  If afflicted, the resistance does not affect the duration of the effect.

A higher Fortitude also helps against PARALYSIS.  Dexterity helps resist against being IMMOBILIZED.   


Abilities are special moves or spells that characters can have.  Abilities tend to be more powerful than normal attacks with weapons, or can affect a target with one or more positive or negative effects.  Many abilities can target multiple characters or monsters at once.  The drawback is that abilities tend to use more stamina than regular attacks. 

Typically during a turn you can either attack, defend, or use an ability, but not more than one of those (there are rare exceptions).  Abilities can be used before or after you move, and you may also move, use an ability, then move some more. 

Most abilities are class-specific, although some abilities are common to all classes (like Power Attack and First Aid) and some are shared by only a few classes (like War Horn which can be used by either Fighters or Paladins).  

Abilities are classified in three groups:   OFFENSIVE, DEFENSIVE and SUPPORT.  Offensive abilities generally do harm to others (think a fireball).  Defensive abilities protect you or others from damage (think a magikal shield).  Support abilities typically buff you or others or boost stats (think healing or making you resistant to poisons). 

As characters gain in experience and level up, they gain more abilities.  Mages and Druids gain an additional ability every level, whereas all the other classes gain one at every odd level (e.g., 1, 3, 5, …).  However, all abilities have varying MINIMUM LEVEL requirements, so when selecting abilities you will only be able to select those that are at or below your current level.  For example, a level 3 Mage can select only level 1, 2, and 3 abilities.  Also keep in mind that, generally, the higher the level ability the higher the stamina that must be expended to use it.  While leveling up, remember this when you see a new powerful one become available.  You may end up expending half of your stamina to use it.  Being able to use a different lower level ability several times for the same amount of stamina may be more advantageous.

Abilities can have very different targeting mechanisms. Some are melee-type and effectively can be used only when you’re in the next square to your target.  Some are RANGED and can be fired at one or more targets from a distance.  Some are AREA-OF-EFFECT and spread out from the caster in a circle.  Some are TARGETED AREA-OF-EFFECT (you’ll see stats for both RANGED and AREA-OF-EFFECT) where you can choose a different spot for the center of the area that it spreads out from. 

Some abilities will affect anyone within range regardless of whether they are your ally or not (), but some are limited to only affecting either allies () or enemies (), depending on whether it is offensive or supportive.  It is important to know how given abilities interact with enemies and/or allies so you don’t accidentally harm your ally or benefit your enemy.

Some abilities rely on having a particular weapon equipped and you can’t use them otherwise.  Some of these may be very specific such as requiring a bow or a crossbow, but others can be general such as requiring any melee weapon.  But most abilities require no weapon at all. 

The majority of abilities have LINE-OF-SIGHT requirements to use them against a given opponent or to position them in a given spot.  If something is blocking the way, you won’t be able to target it.  This is the default action, so it is usually not indicated.  But some abilities, especially those that tend to be “mental” in nature do not have line-of-sight limits and can go “over” enemies in the way.  This is sometimes referred to as VOLLEY.

Most abilities have a COOLDOWN period, which is a number of rounds that must pass before you can use that same ability again (you can use other abilities in the meantime).  The typical cooldown period is 4 rounds, but this can vary.  More powerful abilities, or abilities whose effects last longer, typically have longer cooldown periods between 6 and 12 rounds.  Some abilities have no cooldown period whatsoever and can essentially be used every turn (the Alchemist’s various elemental shots are like this).

Unless stated otherwise, most abilities’ effects last between 2-3 rounds, referred to as DURATION, although the user may possess certain attributes and/or skills that can boost this.  For example, if a Druid casts Bane (a spell that weakens enemies), anyone that is successfully hit will have the WEAK effect applied to them for between 2-3 rounds, assuming no boost from personal traits or skills.  But if this same Druid has the Weak in the Knees skill (which adds +1 duration to any WEAK effects), the duration will be 3-4 rounds.  Until the effect wears off, the victim will only do 50% of their normal melee damage.

Some abilities require an initial roll to see if there is a successful hit, just like with a melee or ranged attack as discussed in the section on Accuracy (although the numbers used may be different).  If the hit is successful, then the ability’s effects are dealt to the victim, whatever they may be.  However, this is typically only the case with abilities that do physical damage or elemental damage. 

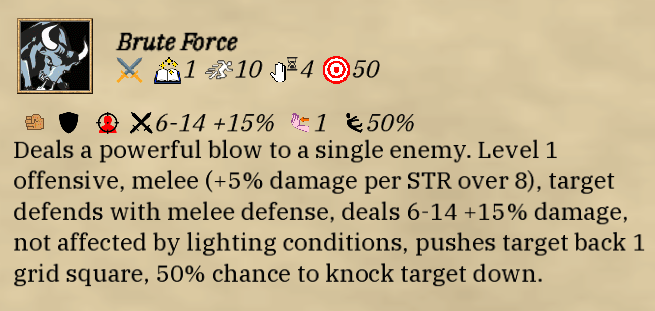
A good example is the Fighter’s Brute Force ability, as shown above.  This ability lets the user ram into an adjacent opponent causing damage and potentially knocking them down.  The ability itself has an underlying ACC of 50 for this specific character, as shown by stat (this is taking all of their skills and bonuses into consideration).  Because you see the ACC stat at all, this tells you that a hit or miss roll must be made first.  When this happens, the target’s DEF or MGK DEF is taken into account (in this case DEF because this is a melee-type attack and the indicator shows that the defender uses DEF).  If the roll is successful and lands a hit, the victim takes roughly 6-14 points of physical damage, plus 15% (indicated by the DAMAGE stat).  Another roll is then made to see if the subsequent KNOCKDOWN effect happens (a 50% chance).  However, if the original roll is a miss, no damage is taken and no subsequent effects happen either.  This makes sense because how could you knock them over if you never hit in the first place? 

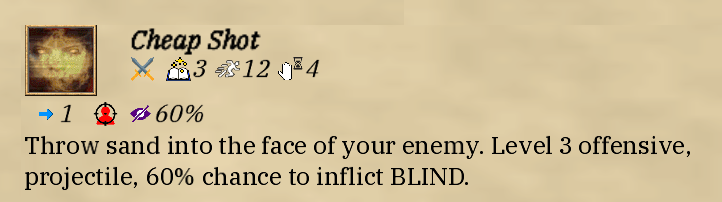
Some abilities only cause status effects and do no physical damage.  These abilities typically only have one roll for the effect itself — not a roll to determine an initial “hit” or “miss”.  A good example of this is the Rogue’s Cheap Shot ability, as seen in this figure, which throws sand in the face of his or her victim potentially causing BLIND.  The absence of the symbol shows that no initial “to hit” roll is required.  The ability has a 60% chance to blind its victim (individual bonuses such as skills and gear are included in this percentage).  When used, there is just the single roll to see if the 60% threshold is met.  If so, the target afflicted with BLIND for several turns.  If not, they are not.  But also keep in mind that victims may have factors that boost their defense against particular effects.  So, for example, if the target has a BLIND RESISTANCE rate of 25%, the 60% rate is reduced by that when the roll is made.

Some abilities can include multiple effects.  You can see Brute Force also has a 1 square PUSHBACK effect.  Because there is no percentage displayed, it is automatic on a hit.  The Druid’s Triple Whammy has a 40% chance to cause SLOW, WEAK, and/or BLIND.  In this case, there is a separate roll for each effect.  The victim could be hit with SLOW but not the other two, or WEAK and BLIND but not SLOW, or all three or none.      

There is one last thing to consider regarding abilities.  Many abilities cause ELEMENTAL damage (FIRE, ICE, SHOCK, POISON, and even in some cases WATER).  As you learned in the Health section of this guide, and will read more on in the Armor section, elemental damage bypasses armor so can be fairly powerful.  But in addition to that, fire, ice and shock have potential follow-on effects for a successful hit, depending on how much damage is done.  The more damage that is done, the more of a chance for the effect.  Fire can cause PANIC, ice can cause SLOW, and shock can cause STUN.  Each of these has a separate roll after the elemental damage is applied and the chance is roughly 5% per damage point done.  So if someone takes 3 points of fire damage, there is a 15% chance they will be afflicted with PANIC (barring any natural resistances to it). 

Ice damage has an additional benefit in that it also reduces stamina by 2 times the amount of elemental damage, so someone that takes 5 points of ice damage also loses 10 points of stamina.  This is automatic with no roll required. 

Shock damage can also travel through water to anyone in an adjacent square to the victim, provided they are both standing (or swimming) in water.  This does not include the original caster of the ability that caused the shock damage.  This “secondary shock” effect has its own “to hit” roll and the potential damage is half that of the original amount.

Poison is considered an elemental attack, but it is different from the others in that it never drains health.  Instead, poisons affect stamina, typically for a few rounds.  This is important to keep in mind so you don’t choose to go it alone in a dungeon armed only with a Wand of Poison.  You may wind up scratching your head as to why you can’t seem to kill any monsters!  Poison is still useful, but not as your sole weapon.  If poisoned, you can mitigate the effects by using DEFEND.  That is detailed more in the Battle Tactics section.

It is important to look at the stats for any given ability to understand how to interact with it.  There really is a lot of variety and each is fairly unique, but once you are familiar with the ins and outs of a given ability, you will find them to be one of the best parts of the game and certainly useful in battle. 


Upgrading Abilities:

NOTE: Ability upgrades are available starting with Version 1.1 (build 75) which is currently in beta testing and will be released soon.


Battle Cry Factor II

Most (not all) abilities can be upgraded at some point.  This process is called FACTORING (e.g., Factor II, Factor III, and Factor IV).  Abilities that are upgraded display the roman numeral over their icon as seen here.  Upgraded abilities are more powerful but use more stamina.  Abilities that factor can be upgraded every 10 levels beyond their MINIMUM LEVEL.  For example, the Ranger and Rogue’s Flaming Arrow ability is level 1.  It can be upgraded to Factor II at level 11, Factor III at level 21, and Factor IV at level 31. 

Upgrading abilities costs progressively more ABILITY POINTS (which are awarded when you level up).  Upgrading an ability from its original form to Factor II costs 2 ability points.  To Factor III costs 4 ability points.  And to Factor IV costs 6 ability points.

Generally, when you upgrade an ability’s factor, the stamina cost rises by 50% and the DURATION and COOLDOWN each increase by 1.  However, the effects of each ability generally increase too.  PHYSICAL and ELEMENTAL DAMAGE usually doubles.  The chance for any given STATUS EFFECT increases by 15% (so a 40% STUN rate becomes 46%).  RESISTANCES rise by 15% (e.g., 40% FIRE RESISTANCE becomes 46%).  Summoned creatures’ levels increase by 10.  Those are generalities, and different abilities can vary, so you’ll need to refer to the specific ability when upgrading to see specifics.

There are still quite a few abilities that cannot be upgraded (you’ll see this icon ).  Typically, these are weapon-based abilities where the damage or the effect is dependent on the weapon itself (e.g., Power Attack, Precision Strike, Sweep Attack, Counter Attack).  These don’t upgrade because the assumption is that as you level up and get better weapons they are naturally upgrading along the way.     

Some abilities don’t factor, but have explicit upgrades.  An example of this is the Mage and Druid’s Open Simple Lock, Open Moderate Lock, and Open Hard Lock abilities.  Each of these requires the one below before you can add it when leveling up, but the older one still exists in your abilities list and either version can be used.  And these only cost one ability point to acquire each new ability.

When you look at the description for any given ability, information on whether it can be upgraded or not will be given including at what level it can be upgraded.

By the way … monsters get ability upgrades as well.  You won’t know who has what, but you should feel it when they attack.  Fair is fair.  You really won’t see this prior to level 20 or so, but at level 30 you should expect most monsters to have about one or two of their abilities upgraded to at least Factor II.  At level 40, likely three or four at Factor II or even one at Factor III.  You probably won’t see a Factor IV until level 75+.  The GAME DIFFICULTY will affect this.  A higher setting will translate to more ability upgrades on monsters, which will mean tougher monsters.

Important note regarding ability upgrading: Just because you CAN upgrade an ability doesn’t mean you SHOULD.  You have to take into consideration the stamina cost of using the new ability as well as the ability points cost.  For example, it doesn’t make much sense to upgrade an ability as soon as you possibly can at level 11 if its stamina cost is a quarter or more of your total stamina.  You couldn’t use it very often (something like a summon may be an exception to this).  Unless you really like that ability and use it a lot and the upgrade effects are significant.  The reality is that most players shouldn’t even think about upgrading anything until maybe level 20.  And even at that, maybe only a select few abilities.  You don’t need to upgrade everything.  And it’s possible that acquiring two new abilities would be better than upgrading one.


Area-of-Effect Sizing:

Many abilities are AREA-OF-EFFECT or RANGED AREA-OF-EFFECT.  These spread their effects over a circular-sized area, either surrounding the caster or surrounding a point within range that the caster chooses.  However, as characters level up, slotting ATTRIBUTE POINTS to various attributes can increase the area-of-effect.  Sometimes this can actually become cumbersome as the target circles get too large to manage and avoid collateral damage on allies.  This is where AREA-OF-EFFECT SIZING comes into play.

First of all, to use this requires the character has invested in the AREA-OF-EFFECT CONTROL skill during upgrading.  This is a SUPPORT skill available to all classes.  If a character has this skill, when they go to target the ability and it is painted on the ground (either in yellow or red), using the mouse wheel will change the size of the target area, shrinking it or growing it.  On a touchscreen, you can also pinch or stretch to adjust this.  You are still limited by the maximum size specified in the ability’s specs, and the smallest is a 5-square “cross”.  Once you have sized appropriately, merely click on one of the yellow/red squares to activate the ability.

One of the things you will notice right away with IDC is that it is fairly difficult to land a hit, even at higher levels and especially at lower levels.  Most monsters are pretty good at defending themselves (luckily so are most adventurers!)  Paying attention to the stats as presented in the COMBAT LOG, especially ACCURACY (ACC) and DEFENSE (DEF), are key to successfully battling monsters.

Accuracy

Accuracy is one of the most important stats in the game

On a basic level, your chance to hit is your ACC minus the defender’s DEF.  Each time you take a swing or cast a spell or whatever to attack, a ROLL is made (if you’re an old D&D fan — which I know you are — think of this as a HUGE 100-sided die that goes from 1 to 100).  If you have an ACC of 50, and the monster has a DEF of 30, you need a 20 or below (out of the roll of 1-100) to land the hit.  Roll a 19, that’s a hit.  Roll a 43, that’s a miss.  

Additionally, a roll of 5 or less is ALWAYS a hit.  So even if the numbers are really stacked against you, you always have at least a 5% chance to hit regardless (that goes for the monsters attacking you as well).  And a roll of 96 or higher is ALWAYS a miss, regardless of your chance to hit.

There is also a chance for a CRITICAL HIT.  If the roll is more than 25 below the required number to hit, it becomes a critical hit and will do 50% more damage than normal.  For example, if your ACC is 65 and their DEF is 25, that requires a roll of 40 or less to hit.  But if the roll is 15 or less (40 – 25 = 15), it is a critical hit.  Some abilities and skills can also boost your critical hit chance, either temporarily or permanently. 

There’s a lot that goes into someone’s ACC and someone’s DEF.  Accuracy is greatly controlled by the weapon being used … some weapons are just more accurate to start with.  Daggers and wands are highly accurate.  One-handed weapons about somewhere in the middle.  Two-handed weapons are generally less accurate.  It all has to do with how wieldy a weapon is. A two-handed sword is harder to swing around than a one-handed sword, and even more so than a one-handed axe.  So you’re less likely to hit your target with a more cumbersome weapon.

Also greatly affecting accuracy is having an AFFINITY for a particular weapon type based on your class (affinity gives +10 ACC).  Weapon skills also boost +5 ACC and generally you can acquire 2 weapon skills for the same weapon type every 10 levels.  So if, say, your character is using a one-handed axe which has a base accuracy of 32, and you have an affinity for one-handed axes as well as 2 of the One-Handed Axes skills, your accuracy will be 52 (32 + 10 affinity + 5 x 2 skills).

Weapons also get an accuracy bonus based on Dexterity.  This bonus equates to +2 per Dexterity over 8.  

There are many other factors that can affect accuracy.  You may have received the benefit of a buff that boosts accuracy.  You may be using a bow or wand and have the Ranged Accuracy skill.  You may have received a positive effect from an activity in town.  Rogues that dual-wield have accuracy bonuses, plus there are specific skills to boost that. There are skills that give accuracy bonuses against certain types of monsters, like Goblinoids or Insects.  On the down side, you may be low on stamina which can lower accuracy, or have an injury that negatively affects accuracy.  A status effect like BLIND will temporarily reduce your ACC by 50%.

A factor that can significantly affect accuracy is the light level.  Unless you have a skill or ability that can compensate, firing into or from dark areas will reduce accuracy.  This is displayed as a DARKNESS PENALTY and can be significant (total darkness will reduce your ACC by 50%).  Plus many monsters can see perfectly fine in the dark so they aren’t affected.  Having a torch in hand, or standing near a light source, can reduce this penalty.

Another significant factor that degrades accuracy is wielding a shield in your off hand.  Shields can increase your DEF, as we’ll discuss in a minute, but they negatively impact your ACC (indicated by the symbol).  How much so depends on the size of the shield and whether you have a skill like Shield Handling to reduce the penalty.

Similar to how a shield reduces ACC, heavy armors (like plate, scale or chain) can also lower your accuracy because you’re less agile in them (indicated by the symbol).

Finally, morale will affect the ACC for NPC’s.  We’ll discuss this in detail in another section, but a happy hireling () can gain as much as +5 ACC and an unhappy one () can lose as much as -5.

For monsters, generally the higher their level the higher their accuracy goes.  So a level 3 skeleton will be more accurate by a few points than a level 1 skeleton.  This keeps adding and adding up as the dungeon levels get harder, so if you don’t keep looking for ways to improve your accuracy as you level up, you may find yourself soon outgunned, even by monsters that at lower levels you didn’t have much trouble with.

It’s important to state here that we’ve been talking about MELEE and RANGED accuracy up to this point.  Some abilities, especially melee-type ones that depend on an equipped weapon, will use the same parameters to determine accuracy as the underlying weapon, although some abilities can also grant an accuracy boost (or reduction).  However, many abilities use different criteria to determine accuracy.  Refer to the stats of any given ability to see its accuracy as they can vary greatly.

Additionally, ability accuracy can be affected by many of the same factors as for melee and ranged attacks, with some additions.  Abilities that are ranged in nature get the Dexterity bonuses previously mentioned.  Some classes get bonuses for particular ability types based on different attributes.  For example, a Paladin using a HOLY ability will get a 5% ACC bonus per Charisma point over 8.  Mages and Druids will receive +3% ACC on MAGIK abilities for each Intelligence point over 8.  And many of the penalties also apply, such as armor, lighting (but not on all abilities), prior hit, morale, etc..

Also, you get a +2 ACC bonus for each level you are beyond the ability’s MINIMUM LEVEL.  So, for example, a level 5 Mage using a level 3 magik spell would get +4 ACC.

Defense

The DEFENSE value is subtracted from an attacker’s ACCURACY to determine the chance to hit.

DEFENSE (DEF) is typically much simpler.  Most characters have a base DEF of 12 plus 2 per level (beyond level 1).  So a level 2 character would have a defense of 14, level 3 would be 16, etc..  Dexterity also contributes to DEF to the tune of 2 points per Dexterity over 8.  

The weapons and/or shield you wield can contribute to DEF via BLOCKING (when a weapon does this it uses the icon and when a shield does it you see the icon).  Shields tend to contribute a significant amount.  A poor wooden buckler would contribute about +4 DEF.  A medium iron heater would be about +9 DEF.  A superior steel tower could be +16 or so.  But most (not all) weapons also have inherent BLOCKING abilities.  For example, most lower quality one-handed weapons have a blocking value of 3, whereas most lower quality two-handed axes, swords, maces and hammers have a blocking of 4. Daggers, spears and crossbows have a lower amount at about 1.  Bows, wands and slingshots don’t block at all.  Staves are pretty good starting around 4 or 5.

The subtlety to understand about weapon and shield blocking is that if you are wielding both, you only get the one from the item with the highest value — you would not get both the blocking from a one-handed weapon and a shield.       

Monsters have varying levels of DEF depending on their capabilities, but similar to ACC it tends to go up as the levels get harder. 

Magik Defense

MAGIK DEFENSE is similar to DEFENSE but used when magik is at play.

Against many abilities, unless they are melee or ranged weapon-types, MAGIK DEFENSE (MGK DEF) is used in the determination to hit.  Most characters have a base MGK DEF of 10 plus 2 per level (beyond level 1).  So, unadjusted, this would tend to be just slightly less than DEF.  But MGK DEF is also boosted by 4 points per Intelligence above 8 and 3 points per Fortitude above 8.

While most monsters use physical-type attacks (think claws or talons), many of them have inherently magikal abilities.  Characters that do not have a higher Intelligence or Fortitude are therefore more susceptible to these types of attacks that defend with MGK DEF.  There are skills that can be slotted that specifically boost MGK DEF, and these are sometimes worth the cost — especially for classes like Fighters that tend not to emphasize Intelligence.

MGK DEF for monsters is similar to DEF in that each monster has varying levels depending on their capabilities.  Some monsters tend to be just naturally stronger in defending against magik.

In the COMBAT LOG, you can tell after an attack whether DEF or MGK DEF was used based on the icon.  Additionally, if you look at the stats for any given ability, it will have an or an indicator to show which type of defense is used when attacked with it.


As you walk around and explore the worlds in IDC, all of your characters will move at the same speed generally, although followers may lag a little behind the formation leader as it takes a little bit for them to start moving and decide how best to follow.

In combat, things are different.  Each character has MOVEMENT POINTS (MP).  This controls how many grid squares in a given turn a character can move before having to expend significant stamina.  If you look at the figure below, the edge of the yellow squares is the character’s MP range.  You can walk as far as that and will only expend a normal amount of stamina (typically 1 point per square, plus 30% of that reduced from maximum stamina).  However, if you walk beyond the green and yellow squares into the red squares, that takes significantly more stamina (3 points per red square plus a 60% reduction to maximum stamina).  Think of the red squares as sprinting.  It takes a lot out of you.  You generally want to avoid walking into the red unless its really necessary as it will quickly deplete stamina.

Generally, characters start with 3 MP and gain 1/3 of a point per Dexterity over 8.  However, this is rounded down so it won’t increase to 4 until your Dexterity is 11.  The Fleet-Footed skill will give +1 MP and is a valuable one that most adventurers will likely add very early on (like at level 2 or 3).  Some things can negatively affect MP as well.  Dwarves automatically have -1 MP which puts them at a significant disadvantage compared to others (they tend to make up for their “shortcomings” with other benefits).  But there are also injuries that you can sustain that lower MP, like a sprained ankle.  The SLOW status effect will also temporarily reduce MP’s in half and significantly hamper movement. 

Different monsters have different movement rates.  Lizardmen, for example, are fairly slow and usually easy to maneuver around without getting too close.  Wolves, on the other hand, are fast and can typically outrun you.


INITIATIVE (IN) is used to determine the order in which each character and monster’s turn proceeds during combat.  The higher the initiative, the earlier the character gets their turn, although it is randomized somewhat at the end of each round.

If you look at the previous figure above, in the upper-left corner you can see the placeholders for each character and monster.  Each round starts with the left-most character or creature and moves to the right.  The end of the round is when all of them have gone, then the order is re-calculated and another round starts.

Characters start with an initiative of 5 and gain half a point per Dexterity over 8.  Each monster’s initiative depends on their personal characteristics.  Most beasts tend to be pretty fast and therefore have a higher initiative.  But others are slower and thus have lower initiative.

Some negative effects, like SLOW, can temporarily lower initiative. 

HEALTH (HP) can be thought of as the amount of damage that your body can take.  Health is displayed as a red bar over each character and also in the lower-left corner of the screen near their portrait.  When your health drops to zero, you don’t immediately die.  But any more damage and you will die.  That does give you a chance to potentially recover some health through an ability.  Take note that this also applies to monsters.  Once you see their red health bar disappear, it takes another hit to actually kill them.

There is an exception to this that can kill a character or monster “in one blow”.  That is when an attack does both physical damage and elemental damage (e.g., fire, ice or shock).  If the physical damage reduces their health down to zero, the subsequent elemental damage can then kill them. 

Note: An option is available in SETTINGS to override this and allow players and creatures to die whenever their HP drops below zero, without requiring the extra hit.  Uncheck the Final Hit to Kill checkbox to enable this. 

Characters start with 20 health plus 1 point per Strength over 8 and 3 points per Constitution over 8.  You also gain 5% per level.  Additionally, there are skills that can boost your health.  There are also temporary positive and negative effects that can boost or lower your health. 

Unlike stamina, you don’t just recover health over time.  Either healing abilities (like First Aid) or camping and resting will recover health.  Returning to town will also restore all health.

Characters also have a MAXIMUM HEALTH, sometimes referred to as RAW HEALTH.  This is the white line that is on your red health bar in the lower-left corner of the screen near your portrait.  This line caps the health that you can have at any time, and the red bar cannot go beyond it.  This is very important because you cannot recover health beyond your maximum health while on an expedition.  The only way to recover it is back in town, where it recovers automatically. 

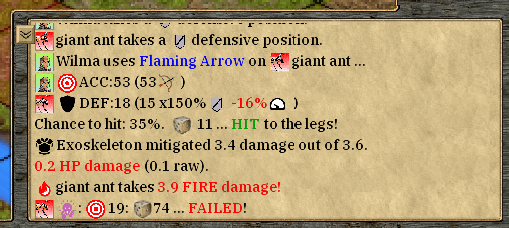
A portion of any physical damage taken will reduce your maximum health.  For normal attacks from melee or ranged weapons, this can vary from between 20-50% on any given hit.  For example, in the figure to the right you can see in this COMBAT LOG that the character took 0.2 HP of damage.  They also sustained 0.1 of that as “raw” damage, which was 50% of the base damage (the part in parenthesis, deducted from maximum health). 

Damage from elemental attacks as well as some abilities which drain health reduce maximum health by 100% of the damage dealt.  So, in our figure you can see that the Flaming Arrow also did 3.9 fire damage.  In this case, the elemental damage displayed in the COMBAT LOG does not show a “raw” amount in parenthesis because it is 100% of the regular amount.  The elemental damage reduced both the health and maximum health by the same amount.

Raw health damage will definitely add up over time during battles on an expedition and may become the deciding factor for whether you abandon an expedition or risk losing your character or an NPC. 

STAMINA (STA) is probably the most important stat in the game.  Stamina represents your overall energy level.  You use stamina for everything — from swinging a sword to casting a spell to walking around.  Even defending against incoming attacks uses up stamina.  Stamina is the green bar that you always see over characters and monsters, as well as down in the lower-left corner of the screen near your portrait. 

Everyone starts with 40 stamina points but then it increases based on your Strength (+5 per point), Constitution (+3 per point) and Dexterity (+2 per point).  It also increases by 5% per level.  There are also skills that can raise your stamina permanently and positive/negative effects that can raise or lower your stamina temporarily.

Stamina is important for two reasons.  First, as mentioned before, stamina is used for everything.  Attacking with a melee weapon takes about 4 points of stamina per swing.  Using a ranged weapon takes less, but still uses it.  So does defending against attacks.  Walking around also takes up stamina, although the amount used depends on the color of the grid squares as you move through them (green and yellow are 1 point per square and red uses 3).  Using abilities can drain a significant amount of stamina.  Generally, the higher the level ability, the more stamina it uses (that’s because it assumes you have more stamina as you increase in level).  

If you run out of stamina, you enter a state referred to as EXHAUSTED.  That is not good.  Someone who is EXHAUSTED cannot attack for a few turns until they recover and movement will be severely limited.  If you find yourself EXHAUSTED, the best thing to do is DEFEND each turn until you’ve replenished enough stamina.  Also, if you don’t have the minimum stamina required for an ability you can’t use it.

The second reason why stamina is important is that when you drop below 50% of your maximum, you start taking both accuracy (ACC) and defense (DEF) penalties.  At close to zero stamina, these penalties can be a 50% deduction.  For example, if you normally have an ACC of 50, running on empty stamina will reduce that to 25!  It is significant.  If you’re at 25% of your maximum stamina, you’ll have a 25% deduction.

So how do you get your stamina back?  That’s where STAMINA REGENERATION comes into play.  Barring some negative affliction, your body will normally regenerate stamina at the start of each turn.  The base amount is 2 plus that increases 0.5 per point of Fortitude over 8 and 5% per level.  So, at level 1 a character with a Fortitude of 9 will have a stamina regeneration rate of 2.5 points per turn.  You probably already see that if a melee attack takes 4, and you’re getting back 2.5, that’s a deficit of 1.5 per turn.  Add in being attacked which will cost 1 and you’re actually losing about 2.5 points per turn.  In battle, you will see your stamina go down.  Using DEFEND will boost your stamina regeneration by 50%, making that 2.5 a 3.75 (more on DEFEND in the Battle Tactics section).  There are also abilities that can replenish stamina as well as boost stamina regeneration for a period of time.  Plus there are skills that can permanently boost the stat.

This is a good time to talk about MAXIMUM STAMINA (sometimes also referred to as RAW STAMINA).  Down in the lower-left corner of the screen when you’re in a world, your maximum stamina is indicated by the white line that is on the green stamina bar.  As you use stamina, a percentage of the stamina used reduces your maximum stamina (generally about 30%, 60% if you’re walking in those red square grids when moving).  While stamina regeneration will allow you to recover stamina, it will not recover beyond your maximum stamina.  So as that white line goes down over time in a battle or while exploring the world, your stamina is essentially capped lower and lower. 

There are only two ways to recover maximum stamina.  One is to camp and rest, which you cannot do in battle.  That will recover it quickly and as the white line goes up, the green bar will follow.  The other way is to use DEFEND.  Using DEFEND will have two outcomes, depending on if you are hit or not while using it.  If hit, your MAXIMUM STAMINA will regenerate by 50% of your normal stamina regeneration rate.  If you are not hit, it will regenerate at the full amount (including the x150% bonus).  So in our example of someone with a STAMINA REGENERATION rate of 2.5, if they use DEFEND and get attacked (hit or miss) on their next turn they will generate 2.5 points of STAMINA and 1.25 points of MAXIMUM STAMINA (2.5 x 50%).  If no one attacked them, they would generate 3.75 points of STAMINA and MAXIMUM STAMINA (2.5 x 150% x 100%).

Old-School Mode: This more difficult option is available on the GAME page of the SETTINGS menu, and stamina regeneration is limited.  To regenerate MAXIMUM STAMINA, you must successfully DEFEND, which means not getting hit.  Doing that will replenish your maximum stamina by only 33% of your stamina regeneration rate (including the 50% bonus).  This was the original design of the game, which some found too difficult, but it is available for those that wish the challenge of having to manage stamina. 

One more factor will affect your stamina regeneration.  Your carrying capacity is based on your Strength, and it is generally 40 units plus 10 units for each Strength point over 8.  However, this is your MAXIMUM CARRYING CAPACITY.  Exceeding that weight will stop you in your tracks and you won’t be able to move at all until you ditch some of it or offload it to another character.  But carrying excessive weight will affect your stamina regeneration.  This kicks in at 50% of your maximum carrying capacity and the more you carry beyond that, the less stamina you will regenerate.  At 90% of your carrying capacity you will stop regenerating stamina entirely.  So keep an eye on this.  You will see an icon over your character’s portrait that gives you an idea of how heavy your load is.  And your own equipped gear (armor and weapons) counts toward this as well.  

NOTE: You can automatically redistribute all loot amongst your entire party to even out the load, based on their individual carrying capacity.  Use the BALANCE button on the INVENTORY screen to do this.  Equipped gear is not moved around, but its weight is taken into consideration in the redistribution.  

IDC is very stats-heavy.  Meaning, if you go wandering through the woods just swinging your sword at any old thing, you might survive for a while but you likely won’t survive for long.  It is important to pay attention to the various numbers that are presented to you in both the COMBAT LOG during combat and on the ATTRIBUTES page for your character and NPC’s.  We’ll briefly discuss some of the main stats that you need to keep an eye on in these sections.


Most SKILLS allow you to boost particular stats in the game.  Some give the ability to perform certain actions (like Lockpicking).  All characters start with one skill.  Mages and Druids gain one additional skill every level.  All other classes gain one skill at each odd level (e.g., 3, 5, 7, …) and two skills at each even level (e.g., 2, 4, 6, …).  

Skills are classified into four categories: OFFENSE, DEFENSE, SUPPORT and ARMOR.  Despite this distinction, they’re mostly used just for logical grouping and when characters level up they can choose from any of these categories (the exception to this is if you do skills training in town — those are specific to a given category).  Skills also have minimum level requirements, so as you level up you will see more skills become available. 

At level 1, only particular OFFENSE skills are available (the ones related to specific weapon types).  This is to simplify the process of selecting the most beneficial skill for newbies.  The list of skills can be quite large and figuring out which to choose can be daunting.  A large group of skills becomes available at level 2. 

Some skills can be negative, although these are specific to given classes or races and none of these are available to choose from when leveling up.  Most classes have both a positive and a negative skill that is automatically assigned.  For example, Fighters automatically get Tough as Nails (Fighter) which gives them 25% WEAK RESISTANCE.  But they also get Fear of Magik (Fighter), which lowers MAGIK DEFENSE by 10%.  Those two are exclusive to Fighters and automatic — they do not require any skill points to be expended.  There is another skill named Tough as Nails that anyone (including Fighters) can pick up and will also give 25% WEAK RESISTANCE (skills stack, so a Fighter that does that would then have 50% WEAK RESISTANCE in all). 

Some skills allow you to acquire them more than once in order to multiply the benefits.  Generally, you’ll see something like “(x1/2)” listed near the skill.  In this case, this would indicate that you have 1 of the maximum 2 instances of this skill, and you could add it again.

Many skills have a base version plus an Advanced, Superior and Expert version starting at levels 10, 20 and 30 respectively.  The higher category skills require the lower-level associated skill to be acquired before you can see it in the list to choose from.  For example, there is the One-Handed Swords skill which gives +5 ACC and +10% DMG when using a one-handed sword and can be acquired twice.  Upon reaching level 10, if you’ve acquired that skill at least once you will see the Advanced One-Handed Swords skill, which also gives +5 ACC and +10% DMG and can be acquired twice.  If you get that one at least once, at level 20 you will see the Superior One-Handed Swords skill.  And Expert One-Handed Swords at level 30. 

WEAPON skills that grant ACC and Damage (DMG) bonuses for particular weapon types are especially useful.  Generally, there are two of these for every weapon type every 10 levels as previously mentioned, and these are some of the most advantageous skills to acquire.  In fact, you must pick one of these skills at level 1 and it is recommended that you get the other one for the same weapon type at level 2.  The section in the guide on Weapons will cover more details, but it is worth noting at this point that most characters should stick to one weapon type to invest skills in and not try to spread them between multiple weapon types (e.g., don’t try to specialize in both one-handed swords and one-handed hammers — choose one and stick to it).  Having said that, it may be advantageous to specialize in both a melee and a ranged weapon, depending on your playing style and preferences.

Many OFFENSE skills also will boost particular status effects or elemental damage types.  An example of this is Hot-Headed, which can boost the accuracy of fire-based attacks by 5% and damage by 10%, or Headbanger which can increase the chance of STUN effects by 5% and their duration by 1 round.  Note that these types of skills boost existing weapon features or character abilities.  They do not grant them.  If a character has an ability that does fire damage then Hot-Headed will boost that.  But just attacking with a plain sword will not do fire damage from having this skill.  But if you have Headbanger and attack with a normal hammer (which has an inherent chance to stun) its effects will be amplified.

There are several OFFENSE skills that grant accuracy and damage bonuses against certain monster types, like Goblinologist or Herpetologist.  These generally give a 15% ACC and DEF plus 10% DMG bonus against monsters in that category.  A character may only possess one of these monster-type skills, so if you pick Goblinologist you may not pick Herpetologist or any other one.

Some skills will boost the range, accuracy or damage of categories of weapons or abilities.  For example, there are skills that will boost the distance for ranged weapons by 1 (that will affect bows, crossbows, wands, slingshots, or staves).  Other skills can boost the range for HOLY, FLASK, PSYCHIC or MAGIK abilities (these are class-specific).

Many DEFENSE skills will either boost your DEF or MGK DEF, or give you increased RESISTANCE to certain effects.  If you prefer using shields, a good one to have is Shield Handling or Shield Defense. These skills will (respectively) lower the shield ACC PENALTY by 25% or raise the BLOCKING by 10% for each version (Base, Advanced, Superior, Expert) for which you acquire it.  

The SUPPORT category has many useful skills, some of which can boost movement, initiative, health, stamina, stamina regeneration, night-vision, healing powers, carrying weight, plus more.  You are more than likely to invest in Fleet-Footed, which grants +1 MP, or In it for the Long Haul, which grants +10% stamina.  Don’t neglect SUPPORT skills as these are some of the best of the bunch!

ARMOR skills will increase the damage mitigation amount that different armor types will do, as well as lower their weight and reduce the degradation rate from taking damage, so these are useful.  Even if you tend to “mix-and-match” different types of armor (e.g., plate chestpiece but leather gloves) it can be beneficial to get one or more covering the types that you typically wear.


When you start a new game you’ll be able to design your character essentially from scratch.  This PLAYER CHARACTER isn’t the only one you will play in the game, but it represents YOU.  Hirelings may come and go, but your player character is the center of your IDC universe.  It is their money you will spend, their house you will build, and if they die, everything and everyone else is gone. 

You can have as many saved games as you wish, each with its own player character that is the center of that universe.  But the games will not cross and are distinct.

Gender

Your first choice for your character is which gender to choose.  As far as gameplay goes, there is no difference.  However, there are several facial features, hairstyles, etc. that are exclusive to either gender (for example, females can’t have beards).  Other than that, it is up to you which you will start with.

Race

In the IDC universe there are six races to choose from: Human, Dwarf, Half-Goblin, Common Elf, Dark Elf, and Golden Elf.  Which one you choose will have a significant impact on the physical characteristics of your character (e.g., male Dwarves all have beards, Elves have no facial hair) but can also limit your Class selection (see next section). 

Additionally, while Humans are the “default” race, the other races all have various benefits and disadvantages compared to Humans.  For example, Dwarves tend to be stronger but have less mobility.  Some races have unique abilities and skills that you automatically receive that aren’t available to others, while others have higher resistances to certain elements.

The first time playing, you may want to stick to being a Human to keep all your options open, but you can play around with the others after you become more familiar with the game.  But even if you do choose to be a Human, you should familiarize yourself with the various pros and cons of the other races as you are likely to hire non-Humans at some point for your expeditions.

Facial Features, Body Sizes and Hairstyles

IDC has a lot of different selections to choose from to customize the look of your character.  Which options you choose are completely aesthetic and have no bearing on your capabilities in the game (e.g., being shorter does not necessarily make you slower, wider does not make you stronger, etc.).  Many of the choices available are controlled by the Gender and Race selected as described above.  For example, Half-Goblins all have green-tinted skin of varying shades, longer noses, and long, pointed ears, whereas Humans and Dwarves cannot have pointed ears. 

Class

There are eight different classes: Fighter, Mage, Cleric, Ranger, Paladin, Druid, Rogue and Alchemist.  Each of these classes are very distinct and most have a unique set of abilities that are typically not available to other classes, although some abilities do overlap. For example, a Druid’s set of abilities will contain various nature-based spells that tend to do elemental damage.  A Fighter is going to have mostly melee-based abilities that are handy in close-quarters combat.  A Cleric will have a lot of buffs that can boost stats for both themselves and others.

And even if you select a particular class, it doesn’t mean that you’re locked into a particular fighting style.  Rangers and Clerics have various abilities that are either melee or ranged in nature, so you will likely select one of those two branches to pursue when upgrading.

As you level up you will also acquire skills, which can boost particular stats or give you the ability to perform certain actions.  While most skills are available to all classes there are some that are exclusive and some that are automatically granted based on class (e.g., Rogues automatically have the Lockpicking skill).  There are also permanent negative effects that are applied depending on class.  

Additionally, each of these classes have affinities for particular weapon types.  For example, Paladins prefer one-handed swords, maces (either one or two-handed), polearms and spears.  Contrast that with a Mage who prefers daggers, staves or wands.  It’s not that they can’t use other weapons, but they receive an automatic +10 accuracy bonus for using a weapon they have an affinity for, so trying to specialize in a weapon outside of your class affinities puts you at a disadvantage.  Refer to the Weapons section in this guide for more information.

There is also another consideration when you select your class.  Each time they level up, Mages and Druids gain 1 ability and 1 skill.  So by the time you reach, say, level 8, they will each have 8 abilities and 8 skills (not counting automatic ones based on class or race).  For all the other classes, they gain 1 ability and 1 skill every odd level, and 2 skills every even level.  So at level 8 they will have 4 abilities and 12 skills.   

There is no “right” or “wrong” class to choose, or an “easy” or “hard” one.  They each have their pros and cons, and generally when creating a larger party by bringing on hirelings you will tend to select different classes so that they complement each other in battle.  So which one you start your game with is entirely up to you.

Attributes

There are six Attributes: Strength, Intelligence, Charisma, Constitution, Dexterity and Fortitude.  When you start, each of these is at an 8 (unless you chose a race that modifies it) and you will have 8 points to spend.  Which ones you should spend your 8 points on can depend a lot on your class as well as your fighting style.  Do you think you’ll prefer melee weapons or ranged weapons?  Do you want to use abilities more often?  Would you rather have a lot of health?  Would you rather get more money for selling loot?  

What you should NOT do is try to evenly spread the 8 points amongst all 6 attributes.  For example, unless you are a Paladin it isn’t recommended that you spend anything on Charisma in the beginning.  Maybe later when you get to the point of bringing on hirelings, but its probably better spent on other attributes early on. 

If you are going to focus on ranged weapons like a bow, crossbow, slingshot, or wand, you’re going to want more Dexterity and less Strength so as to improve accuracy.  But if you will prefer melee weapons, a higher Strength means you will do more damage, and while boosting Dexterity will improve your defense and your melee accuracy. 

Unless you are a spell-caster like a Druid or Mage, don’t bother with Intelligence.  Later on, depending on your class, adding to this may help with certain abilities, but Fighters are rarely better in battle with high mental acuity!  But for Mages and Druids, adding to Intelligence will boost not only spell accuracy but also spell damage.

You should probably slot at least 1, maybe 2, to Constitution no matter what class you are.  Doing so will boost not only your health (+3) but your stamina (+3) too, and stamina is very important in this game.  Strength will boost stamina more (+5) but boost health less (+1). 

Don’t neglect Fortitude!  Besides boosting most resistances to negative effects like bleed, slow, weak, etc. by 5% for each point slotted, it will boost stamina regeneration by half a point per turn.  That can be significant when you’re low and trying to replenish it during battle.

Also remember that even for spell-casters, Strength determines how much loot you can carry.  If you don’t ever slot to it, you will soon find that there is more loot than you can carry out and you will have to make some hard choices.

Again, what you choose to slot to depends heavily on class and play style, but here are some sample recommendations for your first time:

Fighter or Paladin: +3 STR, +2 CON, +2 DEX, +1 FOR

(maybe trade -1 STR for +1 CHR on the Paladin)

Mage or Druid: +3 INT, +2 CON, +2 DEX, +1 FOR

(maybe trade -1 INT for +1 STR to get more stamina)

Cleric, Ranger, Rogue or Alchemist: (ranged) +1 STR, +2 CON, +3 DEX, +2 FOR

Cleric, Ranger, Rogue or Alchemist: (melee) +3 STR, +2 CON, +2 DEX, +1 FOR

Abilities

Abilities are a huge part of the game, and frankly, probably the funnest part.  What can be better than setting a monster on fire, right?  The game has a large variety of abilities that are available, and most are specific to each class.  Initially you’ll have a list of between 2 and 5 abilities to choose from, depending on class, but as you level up more abilities become available.  

There is an entire section in this guide dedicated to Abilities, and you should read that to help decide which you should choose.

One thing to note is that all characters automatically have First Aid, Power Attack and Shove.  You may have others automatically depending on your race.

Skills

Similar to Abilities, there is a large selection of Skills to choose from as you level up, and these are covered in more detail in another section of this guide.  However, only weapon skills are available at level 1.  This is done to simplify the task of creating your initial character as these are the most likely to benefit you initially, and the full list of skills can be somewhat daunting.  

You should generally only choose a weapon skill that is listed in green as these are weapons that (based on your class) you have an affinity for.  As stated before, having an affinity for a given weapon gives you +10 ACC, which is significant (that’s like getting two of these weapon skills for free).  Choosing the matching weapon skill will give an additional +5 ACC, as well as +10% damage, boosting your ACC by 15 (that’s roughly a 15% better chance to hit on any given attack).  

Even if you pick something like a Fighter that has an affinity for two-handed swords or two-handed axes, keep in mind that those weapons are more expensive and you likely can’t afford one right off the bat.  Maybe you choose the Two-Handed Swords skill and then buy a cheap one-handed sword until you’ve gone through one or two worlds and saved up enough to buy a two-handed one?  Maybe you choose the One-Handed Swords skill to boost your stats in the meantime knowing you will switch to two-handed by level 2?  It’s your choice.  But definitely pick something you have an affinity for.

Name and Finishing Up

Finally, name your character or choose a random one, then on the next screen you’ll have a chance to finalize your character.  You can always go back and choose other options, but going back will clear any selections that were made on subsequent screens.

Finally, the game will give you some info to help you out.  Remember that you have no money initially and you’ll need to head to the Merchant to sell that gold nugget that you found.  Then buy a weapon (ideally one of the same type that you have an affinity for and selected the corresponding skill).