Battles in IDC take a while. With one character against one or two monsters, it could be over within a few minutes. But a full party against 5, 6, 7 or more monsters is going to take at least half an hour to complete, maybe more. But battle is the heart of the game, and learning the subtleties of the combat system will help you in your quest to vanquish monsters. Many of the previous sections described various stats used in the game, and we will try to weave all the pieces together here.
As we said several times before, one of the most important stats is the game is ![]() STAMINA. As you walk around exploring the world, you are likely to stumble on monster dens or monsters just roaming around. Typically, monsters will see you long before you see them as most of them have sharp eyesight, hearing, or night-vision. Its recommended that you try to camp often while wandering around so that you don’t stumble upon monsters with depleted stamina. This also goes for carrying around too much, which can lower your
STAMINA. As you walk around exploring the world, you are likely to stumble on monster dens or monsters just roaming around. Typically, monsters will see you long before you see them as most of them have sharp eyesight, hearing, or night-vision. Its recommended that you try to camp often while wandering around so that you don’t stumble upon monsters with depleted stamina. This also goes for carrying around too much, which can lower your ![]() STAMINA REGENERATION.
STAMINA REGENERATION.
As you explore each world you can pretty much wander around freely and any hirelings will automatically follow you. When you stumble upon monsters (or vice versa), the music will change and the game will enter COMBAT MODE. During combat, the action becomes turn-based. Based on their ![]() INITIATIVE and a little randomness, the order of play will be generated. This is seen by the character placeholders in the upper-left corner of the screen. Play progresses from left to right. During someone’s TURN, only they can act (there are potential counter-attacks, but we won’t discuss those now). When they are done taking all of their actions, they end their turn and the next person or monster goes. When everyone has taken their turn, it is the end of the ROUND. The play order is then re-calculated and everyone’s turns start again. This continues until all monsters or the PLAYER CHARACTER is dead (you, not your hirelings), or there is enough distance between the party and the monsters that the monsters break off combat.
INITIATIVE and a little randomness, the order of play will be generated. This is seen by the character placeholders in the upper-left corner of the screen. Play progresses from left to right. During someone’s TURN, only they can act (there are potential counter-attacks, but we won’t discuss those now). When they are done taking all of their actions, they end their turn and the next person or monster goes. When everyone has taken their turn, it is the end of the ROUND. The play order is then re-calculated and everyone’s turns start again. This continues until all monsters or the PLAYER CHARACTER is dead (you, not your hirelings), or there is enough distance between the party and the monsters that the monsters break off combat.
During your turn, you may MOVE at any time, before and/or after an ACTION. However, you are generally limited to one action. That action can be an ATTACK (either melee or ranged), use an ABILITY or end your turn using DEFEND.
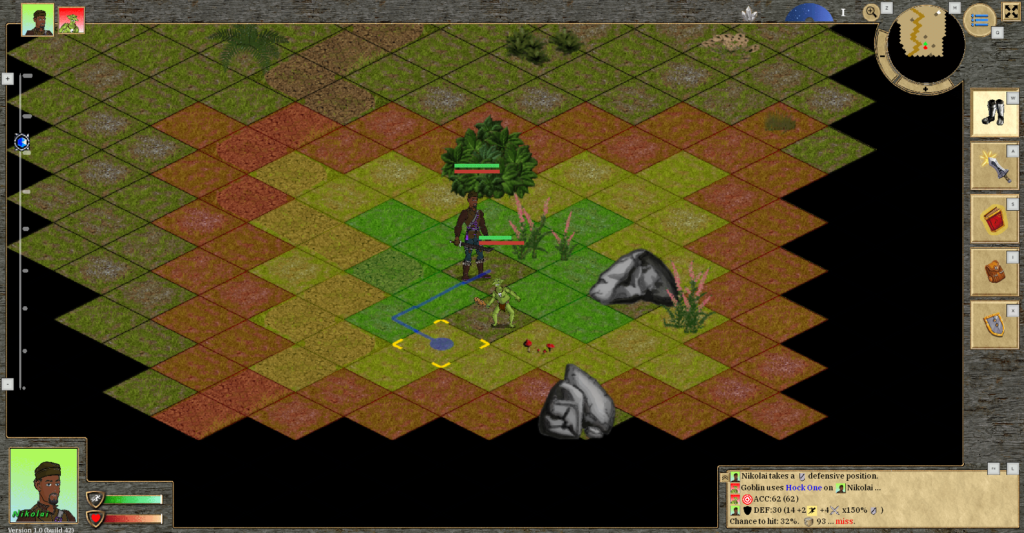
Select the MOVE button to display your movement possibilities (it’s the one you see selected in the image below). If you read the section on Movement and Initiative, you’ll know that the edge of the yellow squares indicates how far your ![]() MOVEMENT POINTS allow you to move without expending extra stamina. You can push it farther and move into the red, but it will cost significantly more stamina. When you select a grid square that is highlighted, you’ll see the blue TRAVEL LINE as shown below. To complete the move there, select the same square a second time. Once you move, the displayed colored grid will change because you have used up some or all of your movement points. You can move again if you wish, or take an action. Remember that you can move at any time during your turn, before or after an action, as long as you have movement points left.
MOVEMENT POINTS allow you to move without expending extra stamina. You can push it farther and move into the red, but it will cost significantly more stamina. When you select a grid square that is highlighted, you’ll see the blue TRAVEL LINE as shown below. To complete the move there, select the same square a second time. Once you move, the displayed colored grid will change because you have used up some or all of your movement points. You can move again if you wish, or take an action. Remember that you can move at any time during your turn, before or after an action, as long as you have movement points left.
 If you read the section on Weapons you’ll know that weapons come in two types:
 ![]() MELEE and
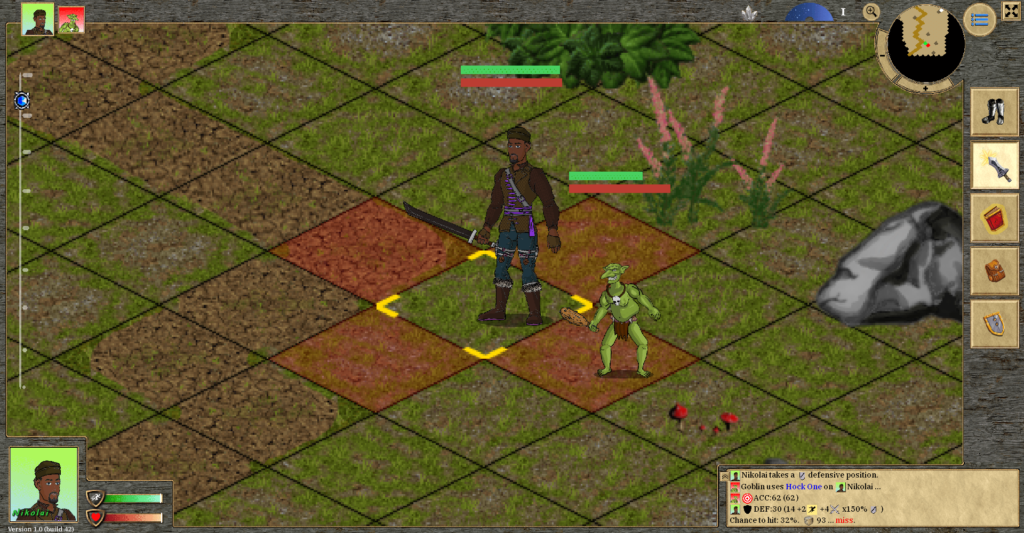
MELEE and ![]() RANGED (staves are a hybrid of the two). To attack with a melee weapon, your target must generally be in the next grid square in any of the cardinal directions (north, south, east, or west). You cannot attack diagonally with a melee weapon. Some weapons, like a POLEARM or SPEAR allow you to attack from 2 squares away, but it must still be cardinal. You can also attack over low objects. For example, if there is a crate in the same square as you but it is between you and a monster, you can attack. When you select the ATTACK button, the ground squares that you can target will be highlighted red, as seen in the image below.
RANGED (staves are a hybrid of the two). To attack with a melee weapon, your target must generally be in the next grid square in any of the cardinal directions (north, south, east, or west). You cannot attack diagonally with a melee weapon. Some weapons, like a POLEARM or SPEAR allow you to attack from 2 squares away, but it must still be cardinal. You can also attack over low objects. For example, if there is a crate in the same square as you but it is between you and a monster, you can attack. When you select the ATTACK button, the ground squares that you can target will be highlighted red, as seen in the image below.
 To attack, select one of the red squares and the targeting
 ![]() RETICULE will highlight that square (ideally one with a monster in it!). To carry out the attack, select the same square a second time. You can change your mind and target another square — just select the same square a second time to actually attack.
RETICULE will highlight that square (ideally one with a monster in it!). To carry out the attack, select the same square a second time. You can change your mind and target another square — just select the same square a second time to actually attack.
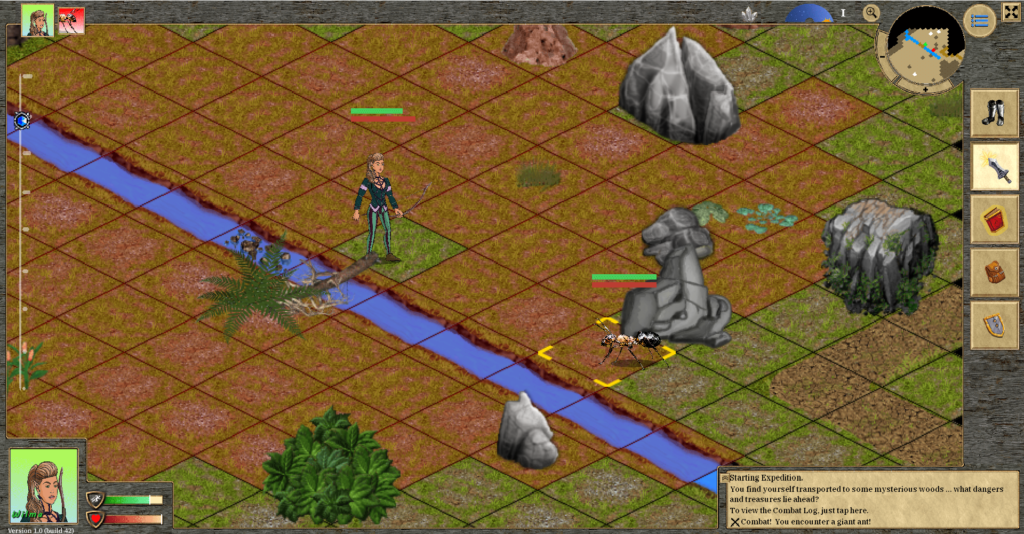 To attack with a ranged weapon, you also select the ATTACK button as shown above. However, the available targeting area will be significantly larger. How large depends on the range of the weapon itself plus any range-boosting skills or buffs you may have. Similar to melee weapons, you can attack over short objects (including shorter monsters). However, ranged weapons are subject to line-of-sight, which means that you can’t hit targets that are obscured by larger objects or normal-sized characters or monsters. If you look at the previous figure, you can see that the red targeting area does not extend beyond the large rock near the top of the screen. But the short boulder in the middle, even though it blocks movement, does not obscure line-of-sight behind it.
Note: when the image above was created (with an earlier version of the game) all creatures blocked line-of sight behind them. That is no longer the case. Shorter creatures, like this ant, would not block the space behind them.
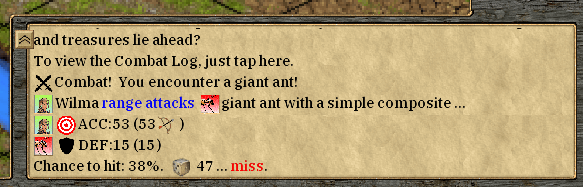 When you attack, you’ll see the actions occur on the screen. Typically you will hear appropriate sounds related to a hit or a miss, and on a hit possibly see some sort of blood spurt or effect on the victim indicating that. But you should also check your COMBAT LOG to see the specifics of the attack. Here you can see the results of Wilma shooting her bow at that giant ant. Start with the line where it says “Wilma range attacks…”. That shows the type of attack that occurred. The next line shows that Wilma’s ACC was 53. Below that you can see the giant ant’s DEF was 15. 53 – 15 = 38, which was the % chance to hit. The roll was a 47 (again, imagine a HUGE 100-sided D&D die being rolled) which resulted in a miss. Even though she missed, 38% for a level 1 character isn’t bad. That essentially means that she’s likely to hit 2 out of every 5 shots with her bow.
It’s a good time to mention that when you start combat, if you’re not familiar with a given monster, or you just want to brush up on their stats and capabilities, you should review their ATTRIBUTES. This can be done by tapping twice on their placeholder in the upper-left corner, or by holding down over the actual monster on the screen.
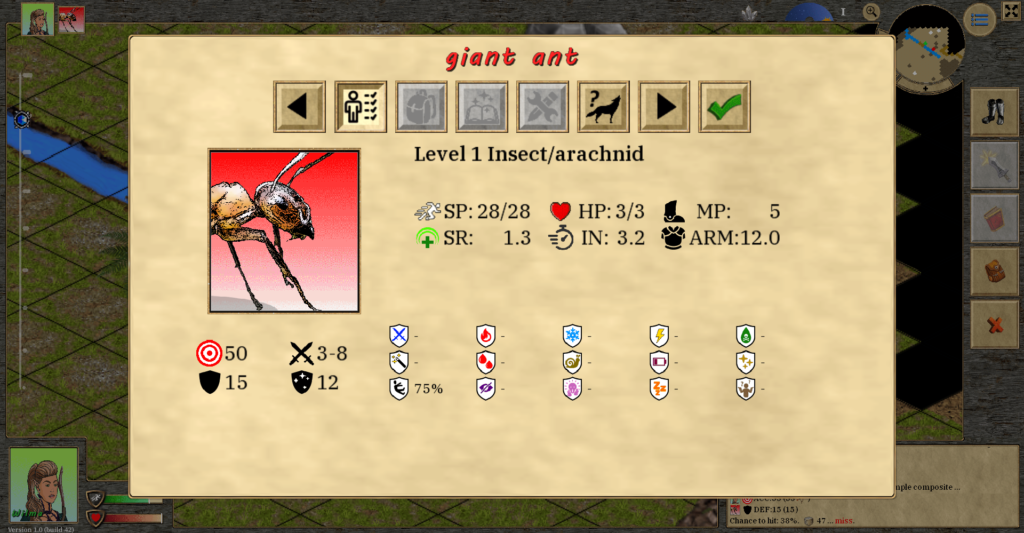 You can see from the screen above that the giant ant only has 3 HEALTH POINTS (HP), which is not a lot. Wilma’s bow does 1-4 damage, plus she has a 20% damage bonus (so she’s really doing 1.2 to 4.8 damage — damage done is rounded to one decimal place, even though the HP here shows a whole number). But the giant ant also has 12 ARMOR. But this is a total number for its entire body — individual body parts have less. So that’s going to protect it a little bit. Still, Wilma likely only has to land 2 or 3 hits to kill this monster.
 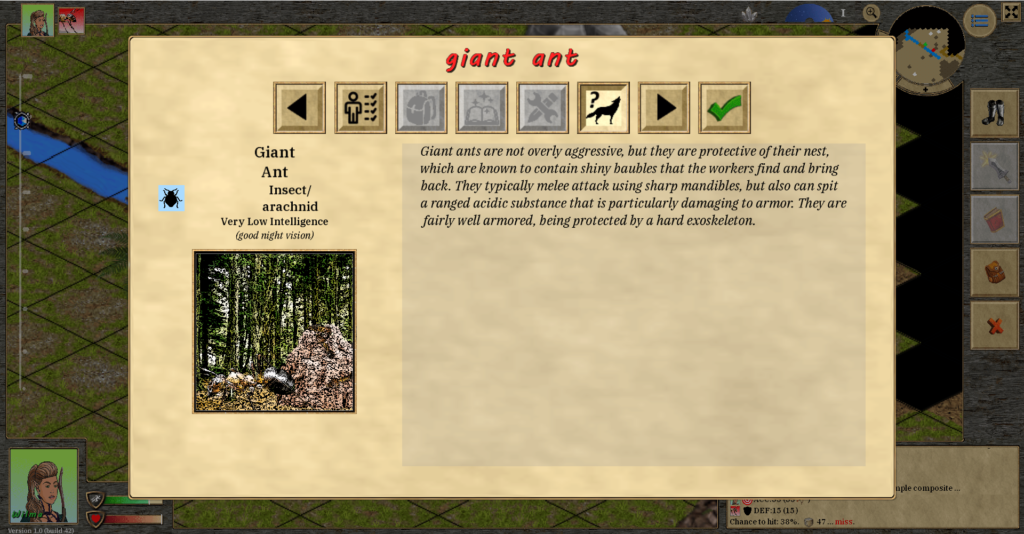 The BESTIARY contains useful information on monsters. Giant ants are simple creatures so not a lot of info, although if you read it you will notice they have an ACID attack. Higher level and more challenging monsters will have a lot more information displayed including some of their known attacks, defenses, and tactics. You should definitely read the bestiary when you encounter a creature you have not encountered before.
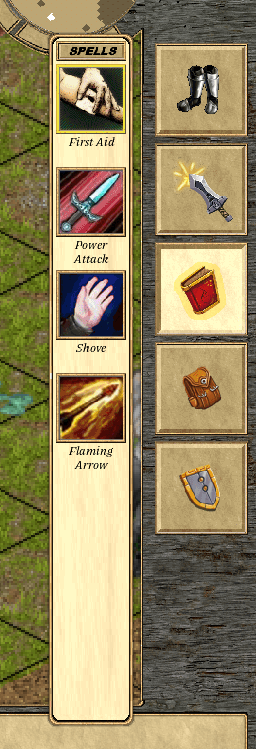
Instead of attacking, you may choose to use an ABILITY. When you select the ABILITY button, a popup menu will display all of the character’s available abilities. You can pull up information on all of them by selecting the SPELLS button. You can also see a lot of info just by hovering the mouse over the ability icon and a tooltip will appear (PC version only). Otherwise, select the ability you wish to use. If an ability is in COOLDOWN, it will be blacked out and you will see a number indicating the number of rounds before it will become available again. Depending on the ability selected, the ground grid will display targeting colors. As mentioned in the Abilities section, many abilities have very different targeting mechanisms. For example, if Wilma selected First Aid, she would only see the grid she is standing in turn green. That’s because you can only use First Aid on yourself and it is a SUPPORT ability. If she selected Shove, she would see only red target squares appear — similar to melee targeting — where there is something that can be shoved (it could be a creature or a moveable object). Selecting either Power Attack or Flaming Arrow would display a large red circle similar to her normal ranged attack targeting. That’s because both of those rely on her currently equipped weapon, which is her bow.
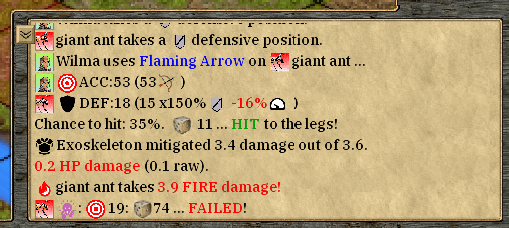 We’ll assume that Wilma chose to use Flaming Arrow. Again, you will see and hear the animations for the attack and possibly some effects (on a hit Flaming Arrow would show some flames burst on the victim). But checking the COMBAT LOG will reveal more details about the attack. We can see here that Wilma had an ACC of 53. However, the DEF line for the giant ant is somewhat different this time. First of all, the giant ant was using
 ![]() DEFEND (we’ll cover that in a bit) so got its normal DEF multiplied by 150%. However, due to slightly low stamina
DEFEND (we’ll cover that in a bit) so got its normal DEF multiplied by 150%. However, due to slightly low stamina![]() , it has a -16% penalty. The result of this was that its DEF was 18. 53 – 18 = 35, which was the % chance to hit. The roll was 11, which resulted in a hit. In this instance it was hit in the legs. The attack would have done 3.6 damage normally, but the giant ant’s armor mitigated 3.4 of that (successive hits would chip away at that and it would mitigate less and less). That leaves 0.2 points of damage to reduce the giant ant’s HP (remember the ant had 3 HP). Since it was a hit, the ability’s successive effects get a roll. Flaming Arrow does 1-4 points of fire damage. Since the giant ant has no FIRE RESISTANCE whatsoever, it is an automatic hit because the original attack was a hit. The ant takes 3.9 points of fire damage.
, it has a -16% penalty. The result of this was that its DEF was 18. 53 – 18 = 35, which was the % chance to hit. The roll was 11, which resulted in a hit. In this instance it was hit in the legs. The attack would have done 3.6 damage normally, but the giant ant’s armor mitigated 3.4 of that (successive hits would chip away at that and it would mitigate less and less). That leaves 0.2 points of damage to reduce the giant ant’s HP (remember the ant had 3 HP). Since it was a hit, the ability’s successive effects get a roll. Flaming Arrow does 1-4 points of fire damage. Since the giant ant has no FIRE RESISTANCE whatsoever, it is an automatic hit because the original attack was a hit. The ant takes 3.9 points of fire damage.
You might be thinking “Hey! The ant only had 3 HP and took 0.2 plus 3.9 damage, which totals 4.1. So why isn’t it dead now?” Remember that to kill anyone, they have to be reduced to zero HP and then take additional damage from another hit. The fire damage reduced the ant to zero. It will take another successful attack for Wilma to kill this ant.
We mentioned in that last ability attack that the giant ant was using DEFEND. It is important to understand this concept as you will use it a lot. Your characters, and monsters, will always defend themselves when attacked. That is the DEF part of the stats displayed in the COMBAT LOG. DEFEND is a distinct action that is taken in lieu of attacking or using an ability. When you select the DEFEND button (the one at the bottom of the buttons list with the ![]() shield on it), you end your turn in a highly defensive position. Anyone that is using DEFEND will display the
shield on it), you end your turn in a highly defensive position. Anyone that is using DEFEND will display the ![]() icon next to their health and stamina bars over them. This has the benefit, as shown with the ant, of boosting your DEF score by 150%. But there is a second benefit as well. When you start your turn, your
icon next to their health and stamina bars over them. This has the benefit, as shown with the ant, of boosting your DEF score by 150%. But there is a second benefit as well. When you start your turn, your ![]() STAMINA REGENERATION will replenish a certain amount of stamina. If your turn starts and you are still using DEFEND (meaning no one attacked you in the interim), your stamina will replenish at 150% of your normal rate. So if you have a stamina regeneration of 3.0, using DEFEND would boost that to 4.5. That is significant, especially in a long battle. However, any incoming attack (whether it hits or misses) between the time you select DEFEND and the start of your next turn will interrupt this bonus — referred to as “breaking someone’s defense”. You will still get the 150% DEF bonus during that attack, but you won’t get the stamina regeneration bonus. You’ll only regenerate your normal amount. Additionally, the 150% DEF bonus is used only once. Any subsequent incoming attacks do not get the DEF bonus until you choose DEFEND again. Refer to the section on Stamina in this guide for more info because there are additional details regarding replenishing MAXIMUM STAMINA that we don’t discuss here.
STAMINA REGENERATION will replenish a certain amount of stamina. If your turn starts and you are still using DEFEND (meaning no one attacked you in the interim), your stamina will replenish at 150% of your normal rate. So if you have a stamina regeneration of 3.0, using DEFEND would boost that to 4.5. That is significant, especially in a long battle. However, any incoming attack (whether it hits or misses) between the time you select DEFEND and the start of your next turn will interrupt this bonus — referred to as “breaking someone’s defense”. You will still get the 150% DEF bonus during that attack, but you won’t get the stamina regeneration bonus. You’ll only regenerate your normal amount. Additionally, the 150% DEF bonus is used only once. Any subsequent incoming attacks do not get the DEF bonus until you choose DEFEND again. Refer to the section on Stamina in this guide for more info because there are additional details regarding replenishing MAXIMUM STAMINA that we don’t discuss here.
Again, you can end your turn with DEFEND if you have not taken an action and have not moved beyond the green highlighted movement squares. If you did any of that, the DEFEND button will display the ![]() icon meaning it will just end your turn.
icon meaning it will just end your turn.
So you may be wondering “If a monster is using DEFEND, should I try to attack since they have the x150% DEF bonus?” The answer is a definitive … it depends. Yes, attacking a monster that is using DEFEND is harder to hit. But by attacking them, you deny them the stamina regeneration bonus. However, sometimes (especially in smaller groups) you may want to get a DEFEND in when a monster chooses to DEFEND. But here’s another scenario: let’s say a monster uses DEFEND and then you attack. They have the upper hand there. And then on their turn they turn around and attack and have a normal attack chance. But if they DEFEND, then you DEFEND, then they attack … you have the upper hand. Then your next attack is a normal attack where they’re not defending. Do you see how that plays out better for you? Of course, you can’t always predict what a monster will do. And that’s why sometimes you just need to go by your intuition.
It is important to note at this point that there are other things you can do that are considered to be “actions” and will prevent you from attacking, using an ability, or using DEFEND during your turn. The first of these is switching any of your equipped armor or weapons or giving gear to another character. This is allowed during combat, but it takes up your action. And it can’t be done during the turn if you’ve already used your action, say with an attack. The other action is checking a container for loot, such as a crate or a chest. Or burning or smashing something. Or picking up something like a torch or a dropped weapon from the ground. All those take up your turn’s action as well.
There is another benefit to DEFEND. If you are afflicted with POISON, successfully using DEFEND will reduce the amount of drain on your stamina by half. Recurring poison comes out of your stamina at the start of your turn, so if you are still using DEFEND (no one attacked you), it will mitigate some of it.
Finally, after you have taken your action and moved as much as you wish, you need to end your turn (again either with the![]() button or the
button or the![]() button).
button).
That is basically the sequence of events that make up turns in combat. The whole thing repeats until, as previously stated, either the monsters are dead or your main character is dead, or you or the monsters have run away and put enough distance between you.
We’ll outline a few more concepts that are crucial to combat:
Delaying your Turn:
![]() Turn order is determined by each character’s
Turn order is determined by each character’s ![]() INITIATIVE (covered in another section) and somewhat randomized. Generally, going first is advantageous as you can attack your enemies earlier, thereby potentially killing or disabling them before their turn comes around. However, there may be times when a given character wishes to postpone their turn to let others go first. This can be done via the DELAY button, which looks like an hourglass shown here. DELAY allows you to postpone your turn until all allies that are immediately to the right of you in the turn order displayed in the upper-left corner of the screen have gone. Note that using DELAY will cost 2 MP and you cannot use DEFEND in your deferred turn (you can, however, take any other actions as you normally would). So, for example, if our turn order looked something like this:
INITIATIVE (covered in another section) and somewhat randomized. Generally, going first is advantageous as you can attack your enemies earlier, thereby potentially killing or disabling them before their turn comes around. However, there may be times when a given character wishes to postpone their turn to let others go first. This can be done via the DELAY button, which looks like an hourglass shown here. DELAY allows you to postpone your turn until all allies that are immediately to the right of you in the turn order displayed in the upper-left corner of the screen have gone. Note that using DELAY will cost 2 MP and you cannot use DEFEND in your deferred turn (you can, however, take any other actions as you normally would). So, for example, if our turn order looked something like this:
MAGE, RANGER, FIGHTER, MONSTER, CLERIC, MONSTER
the Mage could use DELAY and they would then take their turn after the Fighter. Again, you can only delay your turn beyond those allies immediately to your right in the turn order. That first monster interrupts the order, so the Mage would not go after the Cleric. This also means that the Cleric cannot use DELAY as there are no allies immediately to the right of them.
When would you use DELAY? Here’s an example. Let’s say that the Mage wants to use an area-of-effect spell that will buff his/her allies, but the Ranger or Fighter are too far away currently. You could move your Mage, but them maybe that will cause someone else to be out of range. Using DELAY would allow the others to get into position before the Mage’s deferred turn comes around and then they could cast the spell covering everyone.
Another example of when DELAY might be advantageous is if there is a monster that is using DEFEND, and you want someone else to attack first in order to break their defense so that a more powerful character can then follow up with a more damaging attack and have a better hit chance.
Flanking:
One battle concept you should understand is ![]() FLANKING. This occurs when one victim is attacked multiple times between their turns. The first time you are attacked, there is no penalty. That is just a normal attack. But if you are then attacked by someone else, you receive a -10 penalty to your
FLANKING. This occurs when one victim is attacked multiple times between their turns. The first time you are attacked, there is no penalty. That is just a normal attack. But if you are then attacked by someone else, you receive a -10 penalty to your ![]() DEF. A third attack will result in -20 DEF. A fourth -30. Your DEF can never be reduced below zero, but these can be significant. When your turn rolls around again, all FLANKING penalties are cleared.
DEF. A third attack will result in -20 DEF. A fourth -30. Your DEF can never be reduced below zero, but these can be significant. When your turn rolls around again, all FLANKING penalties are cleared.
Keep in mind that stacked FLANKING bonuses roll over between rounds. So if someone attacks you and they are at the end of the play order, then a new round starts and someone attacks you again (even if it was the same one that attacked you previously), the -10 FLANKING is applied. Flanking is only cleared when your next turn starts.
For practical purposes, what this all means is that it is better to gang up on one victim than to try to spread attacks around. Teamwork helps. That may not always be practical in every situation, but you should try to take advantage of FLANKING when possible. Some monsters will react to being flanked by running away in the hopes that they can escape it.
On the flip side, you should try to avoid being flanked. Positioning your characters together in a formation so as to minimize the possibility of multiple attacks on the same character, or using the terrain such as rocks, trees, objects, etc., can be helpful.
One final note: melee and ranged attacks count toward flanking. So do abilities that directly cause physical or elemental damage. An ability that only afflicts a status effect (like Bane which only causes ![]() WEAK but does no damage) does not count toward FLANKING. Nor would something like fire on the ground left over from a prior ability attack.
WEAK but does no damage) does not count toward FLANKING. Nor would something like fire on the ground left over from a prior ability attack.
Prior Hit:
If you (or a monster) are successfully attacked — a hit, not a miss — you will incur a ![]() PRIOR HIT penalty on your next turn. This icon will be visible near your health and stamina bars as well as over your placeholder. If you attack or use an ability in your next turn, you will incur a -20
PRIOR HIT penalty on your next turn. This icon will be visible near your health and stamina bars as well as over your placeholder. If you attack or use an ability in your next turn, you will incur a -20 ![]() ACC penalty. Depending on the circumstances, it may behoove you to use DEFEND on a turn after you’ve been hit. The penalty just lasts the one turn and then goes away, unless you are successfully hit again. Unlike FLANKING these do not stack so you can only have one PRIOR HIT penalty at a time.
ACC penalty. Depending on the circumstances, it may behoove you to use DEFEND on a turn after you’ve been hit. The penalty just lasts the one turn and then goes away, unless you are successfully hit again. Unlike FLANKING these do not stack so you can only have one PRIOR HIT penalty at a time.
Darkness Penalty:
In dark conditions, most characters will suffer a ![]() DARKNESS PENALTY. In pitch black conditions, or close to it, this can be as much as -50%
DARKNESS PENALTY. In pitch black conditions, or close to it, this can be as much as -50% ![]() ACC or -50%
ACC or -50% ![]() DEF. That can be significant, especially when battling monsters that can see in the dark and do not suffer the penalty. But even dark shadows are likely to interfere with your accuracy and defense. The best way to mitigate this is to move closer to a light source and potentially lure the monster closer as well. Or to provide a light source yourself. Torches are provided for free to everyone that goes through the Gate that doesn’t have one, and you can purchase more for a nominal amount. Holding one of these in your off-hand can be advantageous. This is sometimes a serious consideration when forming an expedition party, to ensure that one or more adventurers can carry a torch. You can also drop one or more torches on the ground and pick them up later (that takes up an action in combat).
DEF. That can be significant, especially when battling monsters that can see in the dark and do not suffer the penalty. But even dark shadows are likely to interfere with your accuracy and defense. The best way to mitigate this is to move closer to a light source and potentially lure the monster closer as well. Or to provide a light source yourself. Torches are provided for free to everyone that goes through the Gate that doesn’t have one, and you can purchase more for a nominal amount. Holding one of these in your off-hand can be advantageous. This is sometimes a serious consideration when forming an expedition party, to ensure that one or more adventurers can carry a torch. You can also drop one or more torches on the ground and pick them up later (that takes up an action in combat).
Pro tip: if you equip a shield in your left hand (or can dual-wield and equip a dagger in the left hand), then you equip a torch, the shield (or dagger) will move to your back during exploration and you will hold the torch in your left hand. But when combat starts, you will automatically drop the torch to the ground and wield the previously equipped shield (or dagger) without using any action. This can be handy for providing a light source during combat while still wielding a shield or off-hand dagger.
There are also abilities, such as the Mage’s Mage Light or the Druid’s Moonlight spell, that can provide bright illumination for extended periods of time. These will follow the caster around too. Other abilities provide illumination too, although they tend to be less of it. Obviously, abilities that create fire tend to provide light.
Some weapons provide a fair bit of light, like STAVES and WANDS. But there are also magikal weapons, shields, and armors that may provide light as well, as indicated by the torch+ icon in their description (![]() +++). The more plusses, the brighter the light.
+++). The more plusses, the brighter the light.
Another option is to invest in skills like Night Vision that will lower the Darkness Penalty.
The Three Default Abilities:

Your player and all NPC’s have three abilities by default that they do not have to spend ability points on. The first is Power Attack. This is a good one to use often. It is similar to a normal melee or ranged attack, but you receive a 10% ![]() ACC bonus and a 20%
ACC bonus and a 20% ![]() DMG bonus. However, it uses 6 stamina points versus 4 for a normal melee attack. And it has a
DMG bonus. However, it uses 6 stamina points versus 4 for a normal melee attack. And it has a ![]() COOLDOWN of 4 rounds, so at the most you can use it only once every 4 attacks. Still, you should be using it often. You may not want to waste it during a turn when a target is using DEFEND, but wait for an opportune moment and lit it rip.
COOLDOWN of 4 rounds, so at the most you can use it only once every 4 attacks. Still, you should be using it often. You may not want to waste it during a turn when a target is using DEFEND, but wait for an opportune moment and lit it rip.

The next is First Aid. This is a simple healing ability that can restore 2-4 HP. That isn’t a lot but it does come in handy. You shouldn’t worry too much about keeping your health at 100%, but definitely should use this if it starts dipping too low (or use more powerful healing abilities if you have them). If you use First Aid (or any healing), your health cannot exceed your MAXIMUM HEALTH. That cannot be restored in the field and you’ll have to go back to town to recover it. First Aid also has the added benefit of curing any ![]() BLEED effect, which you’ll know if you read the section on Health is particularly nasty as all damage goes toward RAW HEALTH, which cannot be restored in the field. First Aid cannot be used outside of combat. If you need to heal, camp.
BLEED effect, which you’ll know if you read the section on Health is particularly nasty as all damage goes toward RAW HEALTH, which cannot be restored in the field. First Aid cannot be used outside of combat. If you need to heal, camp.

The last is Shove, which is useful in some circumstances but is definitely not an offensive tool. While it can be used to push a monster back one square, it won’t do any damage or cause ![]() KNOCKDOWN or anything like other abilities can. What it is mostly used for is moving objects (or monsters) out of the way if they are positioned such that you can’t get through. Shove can be used both in and outside of combat.
KNOCKDOWN or anything like other abilities can. What it is mostly used for is moving objects (or monsters) out of the way if they are positioned such that you can’t get through. Shove can be used both in and outside of combat.
Status Effects:
Don’t underestimate STATUS EFFECTS, either targeted at you or used by you against monsters. They’re usually short-lived at around 2-3 rounds but can have significant effects that may tip the scales of a battle. Using ![]() BLIND on someone will cut their ACC and DEF in half, plus reduce ranged attacks by 2 squares. Causing
BLIND on someone will cut their ACC and DEF in half, plus reduce ranged attacks by 2 squares. Causing ![]() STUN on someone means they won’t move or attack and their DEF is lowered to zero while you wail on them. Someone who suffers from
STUN on someone means they won’t move or attack and their DEF is lowered to zero while you wail on them. Someone who suffers from ![]() PANIC will run around all over the place expending stamina and never attacking and have DEF lowered to zero.
PANIC will run around all over the place expending stamina and never attacking and have DEF lowered to zero. ![]() CONFUSE can be especially gratifying watching monsters attack each other, although the actions of those afflicted can be wildly unpredictable and they still might attack you if you’re too close.
CONFUSE can be especially gratifying watching monsters attack each other, although the actions of those afflicted can be wildly unpredictable and they still might attack you if you’re too close. ![]() SLOW will cut someone’s
SLOW will cut someone’s ![]() MOVEMENT and
MOVEMENT and ![]() INITIATIVE in half.
INITIATIVE in half. ![]() SLEEP can take someone out of combat for a bit (you can attack them with a DEF of zero, but they’ll immediately wake up if hit).
SLEEP can take someone out of combat for a bit (you can attack them with a DEF of zero, but they’ll immediately wake up if hit). ![]() WEAK will chop the
WEAK will chop the ![]() MELEE DAMAGE (not
MELEE DAMAGE (not ![]() RANGED DAMAGE) someone does and their
RANGED DAMAGE) someone does and their ![]() STAMINA REGENERATION in half.
STAMINA REGENERATION in half. ![]() KNOCKDOWN does just what it sounds like it does — it knocks them down to the ground where they are vulnerable with a zero DEF and they’ll waste their next turn getting up (plus getting up costs 2 MP).
KNOCKDOWN does just what it sounds like it does — it knocks them down to the ground where they are vulnerable with a zero DEF and they’ll waste their next turn getting up (plus getting up costs 2 MP). ![]() IMMOBILE and BIND will prevent someone from moving out of their square, and BIND will prevent any attacks whereas IMMOBILE prevents melee attacks (or melee-type abilities) but not ranged attacks.
IMMOBILE and BIND will prevent someone from moving out of their square, and BIND will prevent any attacks whereas IMMOBILE prevents melee attacks (or melee-type abilities) but not ranged attacks. ![]() PARALYSIS and
PARALYSIS and ![]() FROZEN prevent the victim from moving or performing any actions and lowers their DEF to zero (Frozen usually protects them in the interim from outside attacks, but does recurring
FROZEN prevent the victim from moving or performing any actions and lowers their DEF to zero (Frozen usually protects them in the interim from outside attacks, but does recurring ![]() ICE damage). Finally,
ICE damage). Finally, ![]() CHARM is particularly nasty as it will turn someone against their comrades, essentially flipping them to the other team for a while.
CHARM is particularly nasty as it will turn someone against their comrades, essentially flipping them to the other team for a while.
Crystals:
During your explorations, you will definitely come across ![]() CRYSTALS. These highly magikal minerals are what power the Gate, and they can be sold at the Merchant back in town. They come in various colors, but there is no functional difference. It is important to note that these do not show up on your MINI-MAP as white dots like loot containers do. You have to keep your eye out for these and they will usually be in rocks or cliffs. They also glow, making them much easier to spot at night.
CRYSTALS. These highly magikal minerals are what power the Gate, and they can be sold at the Merchant back in town. They come in various colors, but there is no functional difference. It is important to note that these do not show up on your MINI-MAP as white dots like loot containers do. You have to keep your eye out for these and they will usually be in rocks or cliffs. They also glow, making them much easier to spot at night.
But it is recommended that you always have at least one crystal in your inventory amongst your party. The reason why is that if you get into trouble — say a battle has gone horribly wrong — you can use the crystal to immediately transport your entire party back to town. You will still posses any loot that you were carrying at the time, but the crystal will be destroyed in the process. This can be a good escape hatch to get you out of trouble if you’re in too deep (or if you’re too lazy to walk all the way back to the Gate). However, if you have hirelings and you escape to town during a battle, they will suffer a morale hit due to the shame of running.
Asleep:
Sometimes you may chance upon a group of monsters that are ASLEEP. You can generally tell by the music, but you will also see the ![]() status icon over their placeholder or next to their health and stamina bars. Attacking a sleeping creature grants a
status icon over their placeholder or next to their health and stamina bars. Attacking a sleeping creature grants a ![]() SURPRISE bonus, plus they have to expend a turn to stand up. However, most creatures have very sensitive hearing, so tread lightly (taking your shoes off can even help) and walk short distances (stay in the green movement squares). If you make too much noise they will likely wake up. Also, attacking a monster will assuredly wake them up, and likely make enough noise to wake others (although this can depend on the attack type and the distance, so its not guaranteed).
SURPRISE bonus, plus they have to expend a turn to stand up. However, most creatures have very sensitive hearing, so tread lightly (taking your shoes off can even help) and walk short distances (stay in the green movement squares). If you make too much noise they will likely wake up. Also, attacking a monster will assuredly wake them up, and likely make enough noise to wake others (although this can depend on the attack type and the distance, so its not guaranteed).
You may also be ambushed by monsters while camping. Unless you’re alone, there will be one character on watch who will be awake. Rangers will automatically wake as well. But other characters may be sleeping. The same rules apply in that loud noises can wake them up. Your characters do not automatically wake when ambushed, but they will definitely wake if attacked. You will also be in a ![]() DOWN status similar to KNOCKDOWN where it will take your action for that turn to get up, as well as 2 MP.
DOWN status similar to KNOCKDOWN where it will take your action for that turn to get up, as well as 2 MP.
Most creatures are awake during the day and sleep at night, although this is not always the case. Some creatures are nocturnal (refer to their Bestiary entry for more info). Some creatures do not sleep at all.

Pro tip: A loud ability such as the Fighter or Paladin’s War Horn is a great way to wake up everyone in your party if ambushed while sleeping. It has the added benefit of boosting their ![]() ACC as well.
ACC as well.